Lab-1-5
(2.5% of the course mark)
EJS Template Language
- EJS.js is a lightweight, easy-to-use templating engine for JavaScript that allows developers to embed JavaScript code directly into HTML templates. It enables the dynamic generation of HTML content based on data provided by the server or application logic. With EJS, developers can create reusable template files containing HTML markup mixed with JavaScript logic, which can be rendered dynamically to produce dynamic web pages.
Lab objectives
-
To understand how to dynamically generate HTML content based on data from the server or application.
-
Promote code reusability by separating HTML markup from JavaScript logic.
-
EJS.js is commonly used with Node.js for server-side rendering of dynamic web pages.
Create an Express.js / EJS app
-
Open VSCode and create a folder named Simple-Express-EJS-App.
-
Open the terminal and change the directory to Simple-Express-EJS-App.
-
Initialize the app by running the following command:
npm init -y
- Install Express.js by running the command:
npm install express
- Install EJS by running the command:
npm install ejs
- Create a file named index.js and add the following code:
// Developer:
// Purpose:

const express = require("express");
const app = express();
const port = 3000;
const APP_NAME = "Simple-Express-EJS-App";

// Use the ejs view engine
app.set("view engine", "ejs");

// Look for templates in the views folder, this is already the default
app.set("views", "./views");

const data = "Hello World EJS";

app.get("/simple", (req, res) => {
  res.render("simple", { data: data });
});

app.listen(port, () => {
  console.log(`${APP_NAME} listening on port ${port}`);
});
-
In the root folder of (Simple-Express-EJS-App), create a folder named: views.
-
Inside the views folder, create a file named: simple.ejs and add the following code:
<!DOCTYPE html>
<html>
  <head>
    <meta charset="utf-8" />
    <meta name="viewport" content="width=device-width, initial-scale=1" />
    <title>Simple EJS demo</title>
  </head>
  <body>
    <!-- Use prettier-ignore to preserve the formatting -->
    <!-- prettier-ignore -->
    <h1><%= data %></h1>
  </body>
</html>
-
Save the changes.
-
Open your browser and navigate to: http://localhost:3000/simple It should display the ejs template file (simple.ejs) which was saved inside the views folder. Take a screenshot and save it as simple-ejs.png.
Add nodemon
- Install nodemon by running the following command:
npm install -D nodemon
- Configure the package.json file by adding a new entry to the scripts property.
"start": "nodemon index.js"
- In the terminal, run the following command:
npm run start
- Confirm that the terminal output is similar the following image:
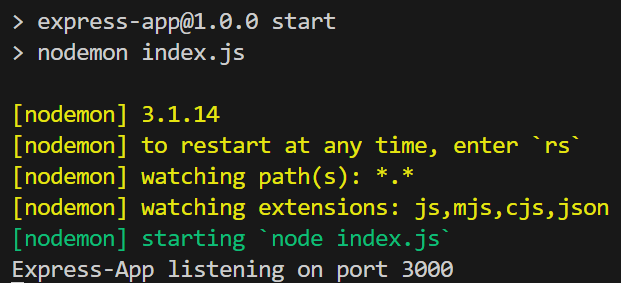
Nodemon restarts your app automatically when it detects file changes, which removes the need to manually stop and restart the server during development.
Add complex ejs templates
- Inside the views folder, create the following files:
content.ejs
header.ejs
footer.ejs
index.ejs
- Update content.ejs and add the following code:
<section class="section">
  <div class="container">
    <div class="box">
      <p class="is-size-2 has-text-centered"><%= content.title %></p>
      <table class="table mx-auto">
        <thead>
          <tr>
            <th>Name</th>
            <th>Code</th>
          </tr>
        </thead>
        <tbody>
          <!-- prettier-ignore -->
          <% content.northAmericanCountries.forEach((country) => { %>
          <tr>
            <td><%= country.name %></td>
            <td><%= country.code %></td>
          </tr>
          <% }) %>
        </tbody>
      </table>
    </div>
  </div>
</section>
- Update header.ejs and add the following code:
<section class="section">
  <div class="container">
    <div class="box"><p class="is-size-2"><%= header.title %></p></div>
  </div>
</section>
- Update footer.ejs and add the following code:
<section class="section">
  <div class="container">
    <div class="box"><p class="is-size-2"><%= footer.title %></p></div>
  </div>
</section>
- Update index.ejs and add the following code:
<html>
  <head>
    <meta charset="utf-8" />
    <meta name="viewport" content="width=device-width, initial-scale=1" />
    <title></title>
    <link
      rel="stylesheet"
      href="https://cdn.jsdelivr.net/npm/bulma@1.0.4/css/bulma.min.css"
    />
  </head>
  <body>
    <!-- prettier-ignore -->
    <%- include ('header', { header: data.header }); %>
    <!-- prettier-ignore -->
    <%- include ('content', { content: data.content }); %>
    <!-- prettier-ignore -->
    <%- include ('footer', {  footer: data.footer }); %>
  </body>
</html>
-
Save the changes.
-
Update index.js and add the following variable declaration and place after: const data = "Hello World EJS";.
const countries = {
  header: { title: "header data..." },
  content: {
    title: "content data...",
    northAmericanCountries: [
      { name: "Canada", code: "CA" },
      { name: "Mexico", code: "MX" },
      { name: "United States", code: "US" },
    ],
  },
  footer: { title: "footer data..." },
};
- Update index.js and add a new route with the following code:
app.get("/", (req, res) => {
  res.render("index", { data: countries });
});
-
Save the changes.
-
Open your browser and navigate to: http://localhost:3000. Take a screenshot and save it as complex-ejs.png.
Price comparison ejs template
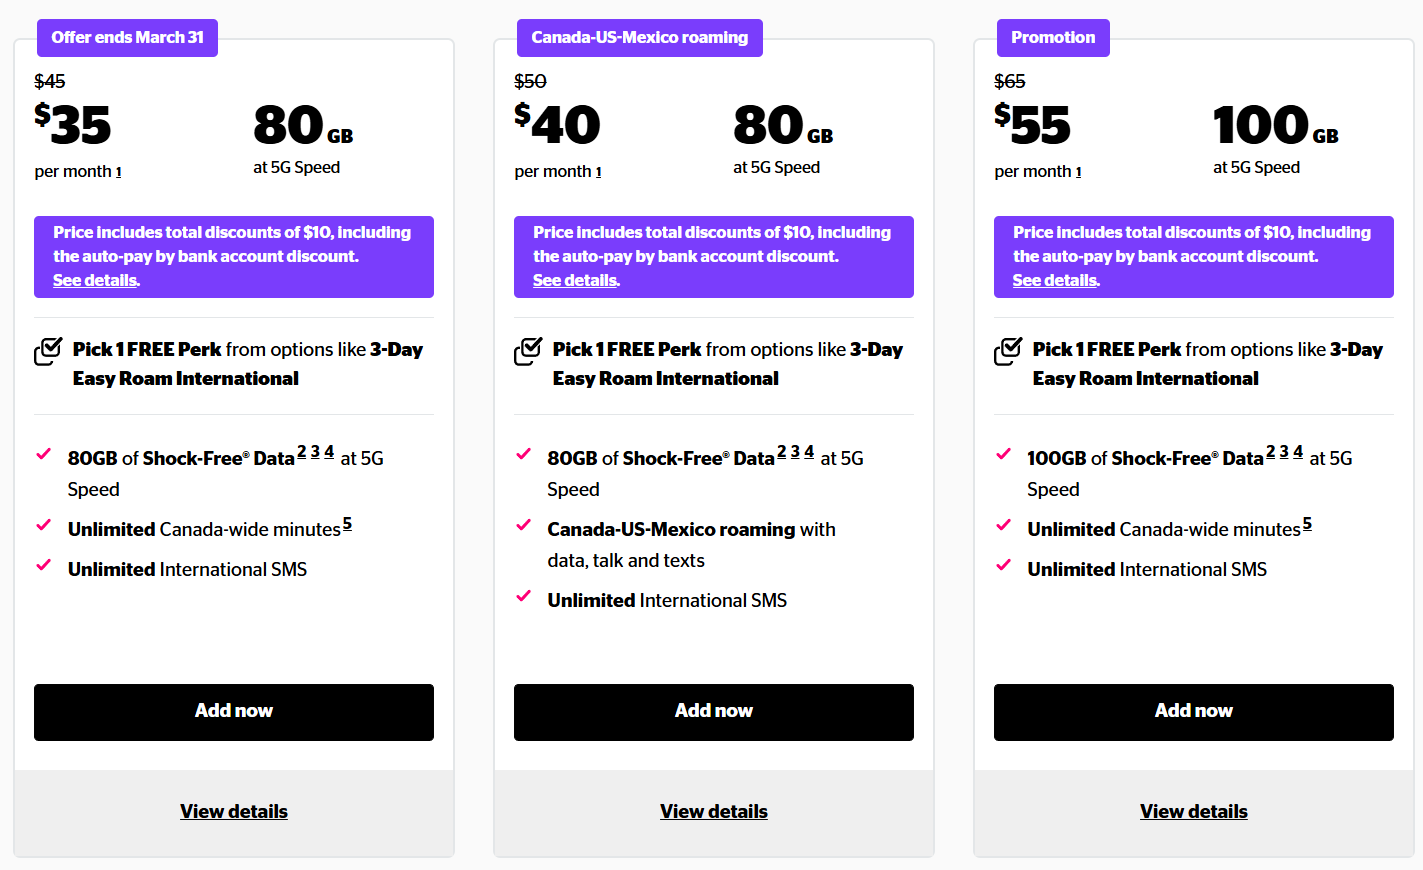
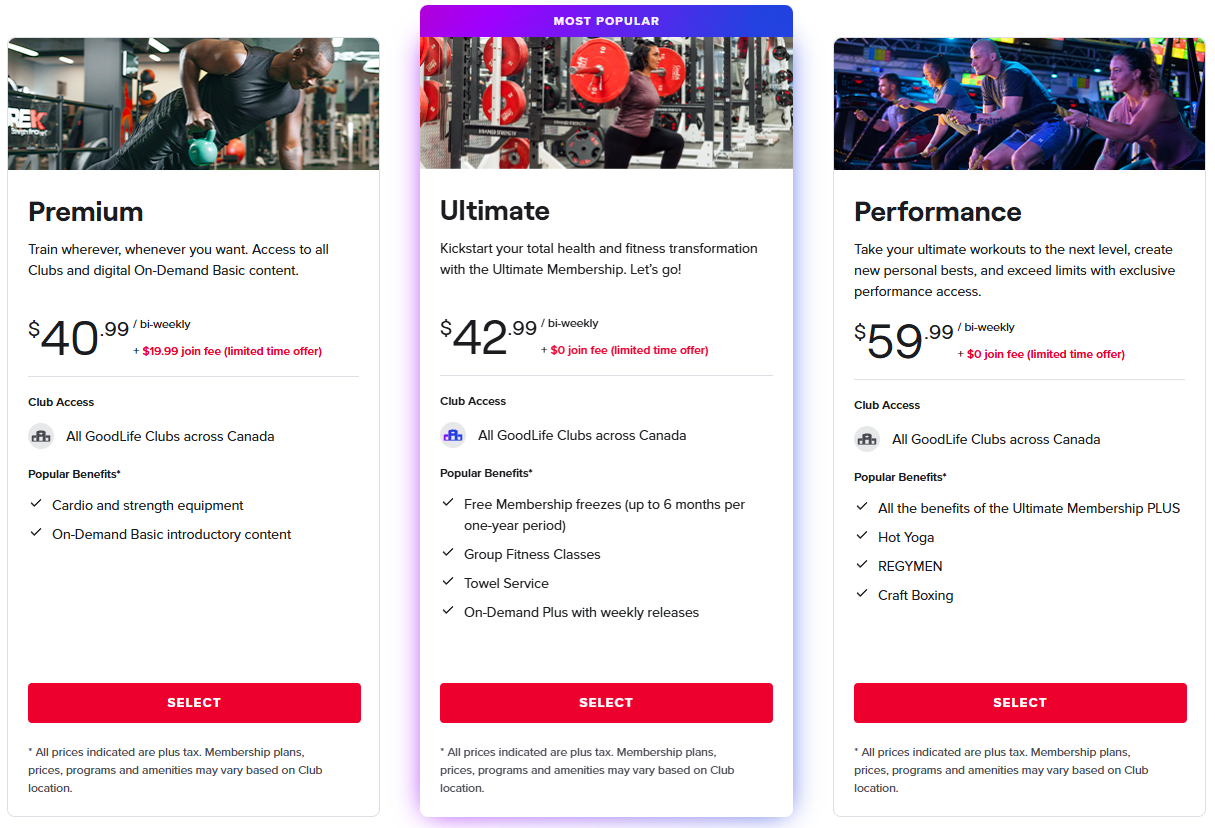
- Create an ejs template to display a page that does price comparisons, use the following images as samples on how it might look. Feel free to use any css framework stack to implement this.
Koodo
GoodLife
Here are some tips on building the price comparison template:
- On index.js, add a new variable which will hold your data.
const products = [
  { name: "name of product 1", price: "0.00", someOtherProperty: "" },
  { name: "name of product 2", price: "0.00", someOtherProperty: "" },
];
- On index.js, add a route to handle the price comparison template and data.
app.get("/price-comparison", (req, res) => {
  res.render("price-comparison", { data: products });
});
-
In the views folder, add an ejs template to accept the data.
-
Choose your favourite css stack to style your ejs template.
- Take a screenshot and save it as price-comparision-template.png.
Using sakura.css and normalize.css
-
Open VSCode and create a folder named app.
-
Download the files sakura.css and normalize.css and save it to the app folder. Make sure to rename them to sakura.css and normalize.css.
-
Copy simple-ejs.png, complex-ejs.png, and price-comparision-template.png to the app folder.
-
In the app folder create a file named: lab-1-5.html and add the following HTML code:
<!--
Developer:
Purpose:
-->

<!DOCTYPE html>
<html>
  <head>
    <meta charset="utf-8" />
    <meta name="viewport" content="width=device-width, initial-scale=1" />
    <!-- Update title -->
    <title></title>
    <!-- Reset styles using normalize -->
    <link rel="stylesheet" href="./normalize.css" />
    <!-- Classless css  -->
    <link rel="stylesheet" href="./sakura.css" />
  </head>
  <body>
    <!-- Enter the HTML codes to display the captured screenshots -->
  </body>
</html>
- For each screenshot implement the HTML codes to display the title, short description, and screenshot image.
Submission
- Create a folder named submit.
Delete the node_modules folder on any app that you are submitting.
-
Copy the Simple-Express-EJS-App and app folders to the submit folder.
-
Create a zip file of the submit folder.
-
Navigate back to where the lab was originally downloaded, there should be a Submissions section (see below) where the zip file can be uploaded.